
Overview
CSV File integration is a useful way to import orders from platforms Tradebox doesn't have an API connection with. Once a CSV channel is created, it's normally possible to completely automate the order download process.
CSV channels are used for some marketplaces with which we're familiar and have been partnered for several years and for bespoke connections to systems we haven't dealt with before. That's part of the beauty of CSV; it's a universal standard for allowing different systems to share information.
This article describes CSV channel setup, which applies to Linnworks, Opencart or Romancart. For further information specific to each of those integrations, click the marketplace name. For Amazon, eBay, Magento v1, Magento v2, Bigcommerce, ekmPowershop, WooCommerce or Shopify, instead see their appropriate page on the Channel Integration Guides section.
This article also describes CSV channel setup for bespoke/custom channels; basically, any marketplace or webstore not mentioned above. If you're setting up a custom channel, you'll first need to check that your marketplace can export the orders in a CSV format that meets Tradebox's file specifications. An in-depth explanation of the required CSV file format, including a sample file, is available within the CSV order specification article. If you're unsure about exporting data from your webstore and whether this is a native function or will need to be added, check with your web developer. Understanding the properties and format of the data in the file is key to making this integration as smooth as possible. If you have questions about the integration or need any assistance, contact Tradebox Support.
To keep the integration working smoothly, it's really important that all the files going through a CSV channel are consistent; having the same data in the same order every time.
If the file presented isn't in the normal format, or an important field is left blank, the entire order file will be rejected to make it obvious there's a problem somewhere.
Once you've been through this article and created your CSV channel, we recommend reading the CSV Channel Configuration Guide that explains the configuration settings in the channel after it has been created.
Preparation
- You will need to download and save an example of your CSV order file locally, with orders in it, to be used by Tradebox during the setup. Make sure this file isn't open in Excel or any other program.
- Part of the channel setup will involve choosing how information for more complex orders is presented. If you're generating your own file of test orders, you should make sure you've got at least one example of each of the following:
- Multi-item orders
- Orders with discount (where applicable)
- Any marketplaces, statuses, filters or payment methods you wish Tradebox to use to differentiate orders.
- If you are publishing your CSV file to an FTP server you'll need the FTP login credentials to hand.
Creating the Sales Channel
Launch the New Sales Channel Wizard via Channels > New.
The wizard will take you through the necessary steps to create your channel. The options you choose during setup can be amended later by going to Channels and double-clicking the Custom channel to open it.
Select File Import from the Marketplace drop down list, then click Next.
Sales Channel Details
Enter a Name for the sales channel (max. 50 characters). This is a label purely for you to identify the channel and can be amended at any time.
Choose your Site Currency from the dropdown. Each channel in Tradebox can only import sales in a single currency. If you sell in multiple currencies you will need to create a different channel in Tradebox for each currency.
If you're setting up multiple channels to handle different currencies, it's fine to use a single import file containing orders in multiple currencies, so long as the file contains the 3-letter currency code on every line. Within each sales channel, orders that don't match the channel's currency will be ignored.
FTP Download (Optional)
Part of the download process is to move a valid CSV order file into the channel's Input Folder. One optional method of doing this is to use an FTP server to synchronise the file. Tradebox does not provide an FTP server for this, but your website host should be able to. Alternatively, you can copy/paste the file into the Input Folder manually whenever you wish to download orders.
If you're using FTP, enter your connection details into the fields in this section.
Server: If you are using FTP or FTPS, this should specify the FTP server name and the exact directory on the FTP where the file is stored. On the example above, Tradebox is looking for a subfolder called CSV on the root of the FTP. The address needs to include the prefix indicating the connection type: ftp:// or ftps:// or stfp://. In the case of SFTP, the server address should only include the host, and not the subfolders, which should be included in the file name field instead.
User Name: The username/logon name that has been set up on your FTP for Tradebox to gain access.
Password: The password that goes with the username specified above.
Filename: If your will always be generated with the same name, you can enter it here. If the file name will change, enter * instead. If you are using SFTP, this field should contain the subfolder directory as well, e.g. subfolder1\subfolder2\*
Port: The port that Tradebox will use to access the FTP. By default, this will show 0, meaning Tradebox will use the default port for each connection type (FTP: 21, SFTP: 22, FTPS: 990, FTPS over TLS: 21). If your connection requires a different port, enter it here.
FTP Uses Active Mode: Refers to Active vs. Passive FTP connections. Most FTP's are passive, tick the box if your FTP requires an Active connection. If you're unsure, check with your FTP provider.
Enable SSL: This option should only be ticked if your FTP requires SSL. Check with your FTP provider if you are unsure.
Delete File From Server: If ticked, this will delete order files from your FTP location once Tradebox has processed the file.
If you have multiple channels reading the same file from the same FTP, this should be left unticked so all channels can access the file. Deleting files from the FTP after they've been read isn't necessary for Tradebox; each sales channel will check each order to see if it has already been presented on an earlier download, so there's no risk in having the same file downloaded and processed multiple times.
Click Next to continue.
Import File Details
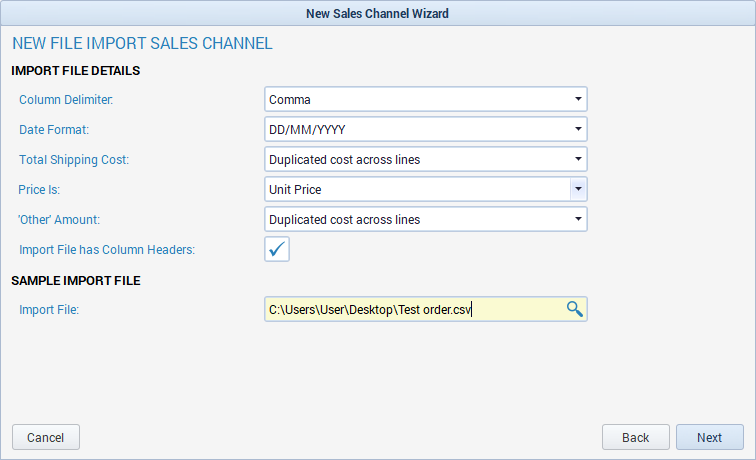
The Import File Details screen is where you'll let Tradebox know how to read the information in your file.
Column Delimiter: refers to how your file presents a break between fields. Most CSV files are comma-delimited, though Tradebox can also handle tab-delimited or semi-colon-delimited files.
Date Format: choose the format that represents the dates in your file. Timestamps are imported only if separated from the date by a space and only if in format HH:MM:SS.
If you're checking date formats, make sure to open and view the file in Notepad; Excel will auto convert dates in CSV files which can lead to confusion.
Total Shipping Cost: refers to how your file presents the carriage value for multi-line orders. The options are to read as a Duplicated Cost Across Lines or as an Individual Cost Per Line. See how is shipping cost calculated? for more details.
Price Is: refers to how the product price is displayed in the file. These can either be the unit price or a line price (the total price of the units on the line. A line total inclusive of carriage or other charges is not supported). This option determines whether Tradebox will multiply the unit price by the quantity to calculate the line price, or divide the line price by the quantity to calculate the unit price.
Other Amount: is usually an additional service the buyer pays for, like gift wrap or shipping insurance. This option refers to how the Other Amount is displayed against each item in the file and follows the same logic as Total Shipping Cost above.
Import File Has Column Headers: should be ticked if the first row in your CSV file is a header/column label row. If the first row is your first order, untick this box. While files with or without headers are supported, if your marketplace gives you the option we'd generally advise using files with headers as this will make it easier for you to check the file in the event of any discrepancies.
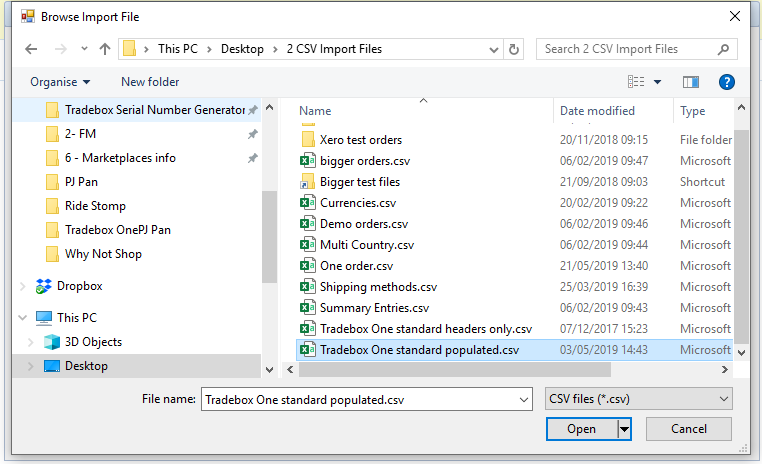
Next, you’ll need to choose an example of the import file to allow Tradebox to map the fields. Make sure your file isn't open in any other program. Click the  button > browse to and select your file and click Open. Click Next to continue.
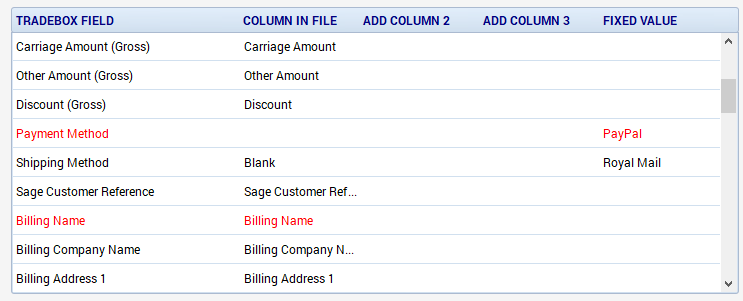
Import File Format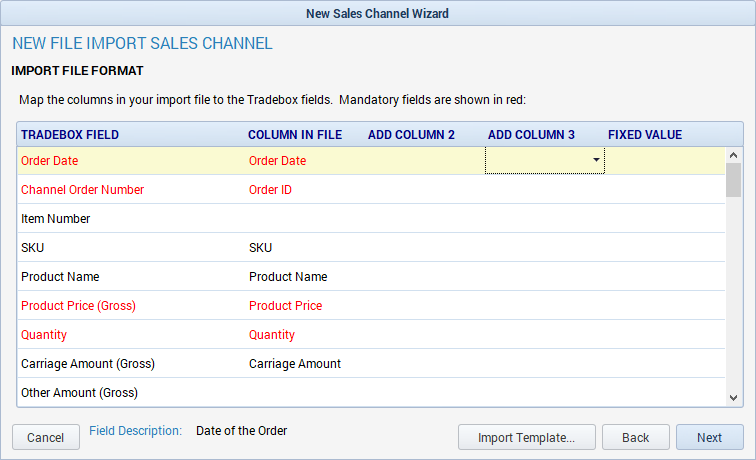
This grid displays the possible fields that Tradebox can import and the corresponding columns from your file that they are mapped to. Mandatory fields appear in red and must either be mapped to a column in the file or set to a fixed value.
If your file has headers, Tradebox will attempt to automatically match the columns in the file with the relevant Tradebox fields. If your file doesn't have headers, the columns will appear as A, B, C, D and so on.
To add or change a mapping, click into the Column in File and select from the dropdown.
Where a value will always be the same for every order, you can use a fixed value. This can also be used if your file does not contain a required piece of information. For example, if every order through your marketplace is paid by PayPal and your file doesn't contain this information, you could set a fixed value of PayPal against the Payment Method field. To add a fixed value, leave the Column In File blank and type directly into the Fixed Value column.
Order Date and Channel Order Number cannot be set to a fixed value and must be mapped to a column in the file. The other mandatory fields can be set to a fixed value if they are not present in your order file, as can any optional fields.
Sometimes the information that represents one field in Tradebox may be presented as multiple fields in the file. For example, if your file carried the buyer's first name (John) and last name (Smith) separately, you'd want to amalgamate this into Tradebox's Billing Name field as John Smith. Use the Add Column 2 and Add Column 3 fields for this concatenation; in this example you'd map Column in File to your file's First Name column and you'd map Add Column 2 to your file's Last Name column.
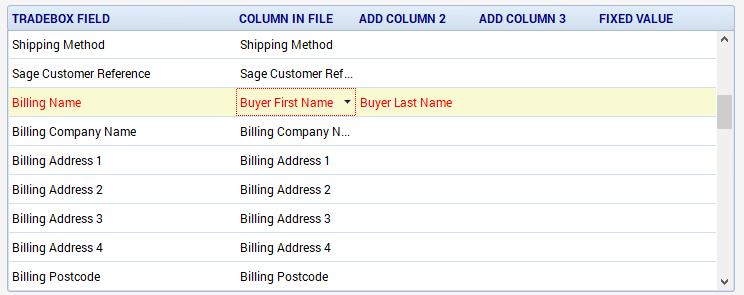
Where the field represents a monetary value, adding columns will take the total of the columns mapped. The common example is to calculate gross prices, which are a requirement of the software. If the CSV file contains the net unit price (exclusive of VAT) and the amount of VAT per unit in separate fields this feature can be used to combine the 2 prices to calculate the gross price. For example:
| Tradebox Field | Column in File | Add Column 2 |
| Product Price (Gross) | Unit_Price_Net | Unit_VAT_Amount |
The CSV specification article provides guidance on all of the available Tradebox fields, how the data needs to be configured in the file and how this data is used in Tradebox.
Once you've mapped all your fields, click Next to continue.
Sales Sources
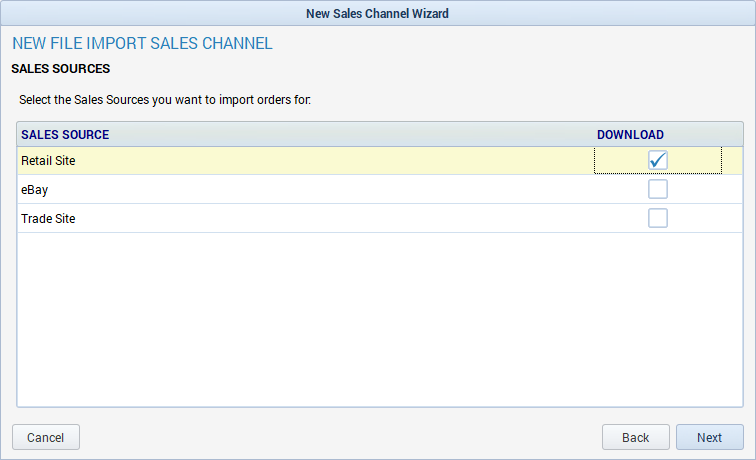
If your file doesn't contain a sales source, this screen will be blank and you should click Next to continue.
Tradebox can import or ignore orders based on the source of the sale, if the information is provided in the file. This is useful if all orders appear in the same file, but you want to apply different settings depending on where the sale originated. If you mapped a sales source from your file in the previous screen, Tradebox will display a list of every unique entry that was present in your example file. The list of sales sources can be amended in the sales channel details screen after the channel has been created. In the above example the channel has been set only to download orders placed on the user's retail site, as opposed to eBay or the trade site.
Order Statuses
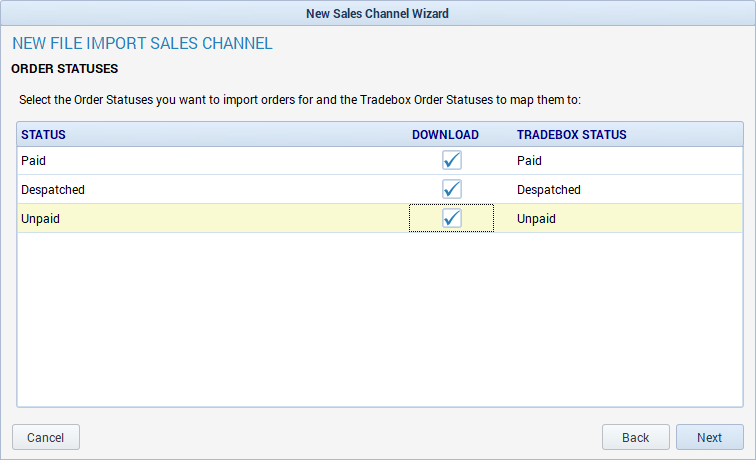
If an order status column has been mapped from your file, Tradebox will display each unique entry detected in this screen. You can choose which of those you want to download, and map them to a corresponding Tradebox status. If there are any statuses you wish to download that don't appear in your example file, you can manually add them after the set up is complete in the Statuses tab of the channel.
If your file doesn't contain an order status column you'll be asked here to choose a default status.
Click Next.
Discount Type and Product Details
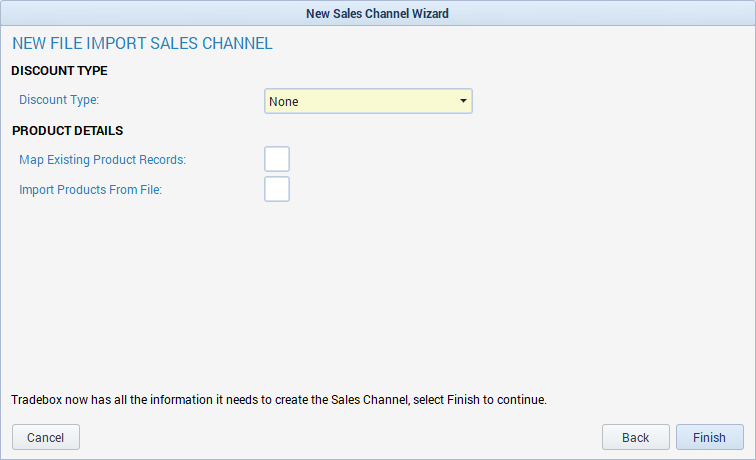
Discount Type
If your file contains a discount column, you'll need to choose the appropriate discount type:
- None: no discounts are processed. If a discount column has been mapped, its value is ignored. This is also the correct setting if the prices in your file already show as post-discount.
- Order: expects the same total discount amount to show on every line of an order in your file. The discount will be applied in Tradebox as a negative line after the last item line.
- Item Line: expects the discount amount to be presented per-item line, so you wouldn't see the same amount on every line of an order. If you choose Item Line you'll then need to choose from the additional dropdown that appears whether it's a Line or a Unit discount:
- Line: the discount amount is shown for all units of this item. So if the buyer has ordered 3 quantity of an item and there's a £5 discount off each, the file would show 15.00 in the discount column.
- Unit: the discount amount is shown per-unit. So if the buyer has ordered 3 quantity of an item and there's a £5 discount off each, the file would show 5.00 in the discount column.
A Linnworks file generated using the script in our Linnworks Setup guide will use an Order discount.
This option can be amended at any time in the sales channel details screen of an existing channel.
Product Details
The options under Product Details only apply if you're using standalone Tradebox stock control. If your stock control method is set to your accounts package or to none, these will be hidden and you can click Finish to complete the wizard.
For users who are set to Tradebox stock control, you'll see two further options:
- If you've already created your product list in Tradebox, tick Map Existing Product Records. This will create a mapping for any items on this channel where the SKUs are an exact match with the SKUs you've already created in Tradebox. If you have any SKUs that don't match, you'll need to create product mappings later.
- If you haven't built your product list yet and you want to use an export file containing your webstore's products as the master list of SKUs in Tradebox, tick Import Products From File. You'll then be prompted to browse for your product file, click here for a full guide to product import.
- If you haven't built your product list yet and don't want to use your webstore products as the master SKUs in Tradebox, leave both boxes unticked.
Click Finish to complete the wizard.
If you are connecting Tradebox to your accounts package, you will then be prompted to set up an accounts link. See our guides for accounts links connecting to Sage 50 or to Xero.
Once the Sales Channel wizard is complete you can configure additional channel settings. See the CSV Channel Configuration article for a detailed explanation of all the options in a CSV channel.
Importing Orders
Once your sales channel has been set up and configured, you can begin importing orders. Unless you have Tradebox set up to download your order file from an FTP, you will need to manually place the file into the input folder for Tradebox to process.
When you set up the sales channel, Tradebox will automatically create an input and an output folder within the Tradebox data folder. These are stored in the Import File section of the sales channel which you can access after set up.
You can use the default folders, or redirect Tradebox to your own using the icon. To open a folder, simply click on the  icon or click Action > Open 'in' folder in file explorer. Please note that these folders should only be used to store files intended for Tradebox to read.
Comments
0 comments
Article is closed for comments.