
This article explains the configuration settings available in a Tradebox Channel that has been set up to import CSV files. To access the channel configuration settings go to the Channels Module and either double click on the channel from the list or select the channel and choose the Edit button. The Channel is split into 8 tabs:
- DETAILS - Channel Integration and configuration settings
- VAT - Tradebox's VAT settings
- ORDERS - a list of orders downloaded from this channel
- SALES - Graph comparing last 3 calendar years' sales
- STATUSES - Table mapping marketplace statuses to Tradebox statuses
- SAGE 50/XERO - settings for accounts integration
- IMPORT FILE - shows the existing file mapping and FTP details
- EXPORT FILE - shows the FTP details and folder for the stock upload CSV file
Details
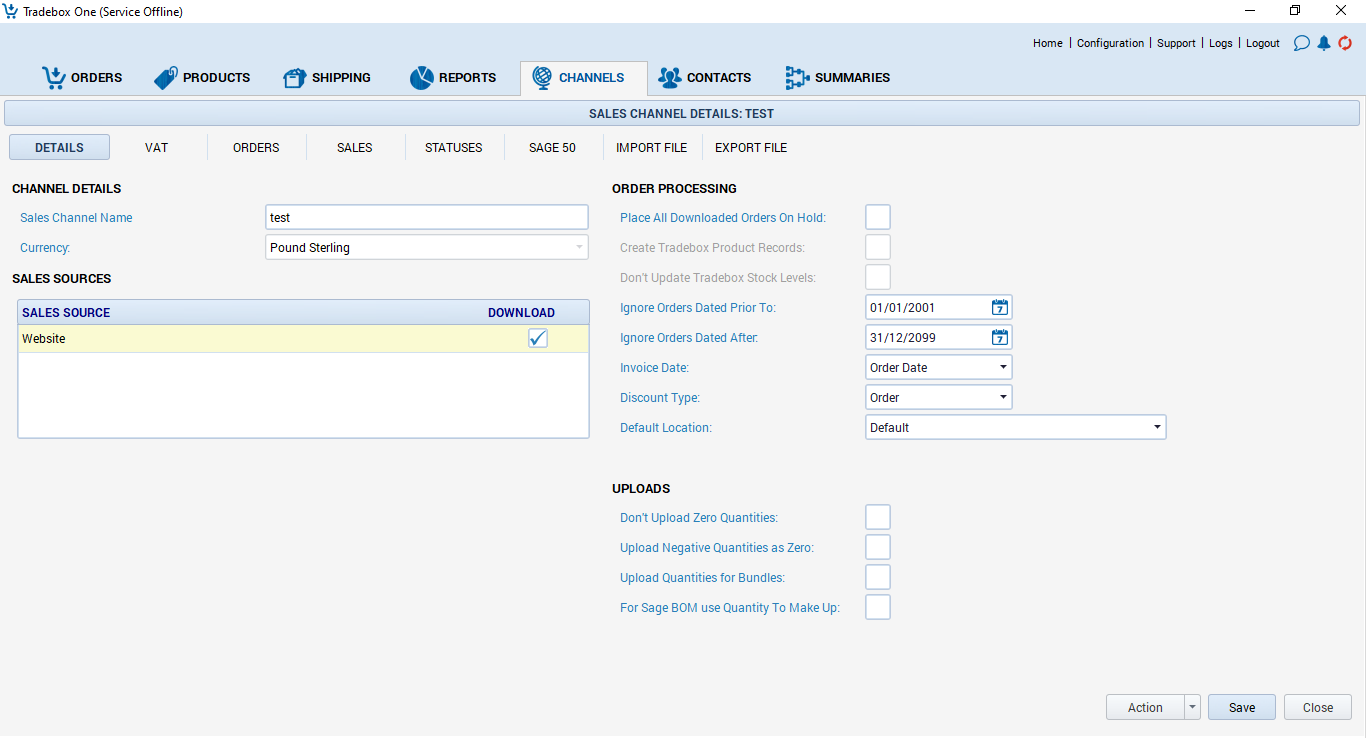
Channel Details
Name is simply the label given to the channel to identify it. This appears in reports within Tradebox and against orders. To change this simply overwrite the existing entry and select the Save button.
Currency displays the currency of the channel. This field cannot be changed once it has been established. A Tradebox channel can only import sales that have a matching currency.
Sales Sources
If the CSV file contains a column containing the origin of the sale AND this column is mapped in the Import File Tab then this entry will be included in the Sales Sources grid. This is relatively common in websites that are integrated with marketplaces such as eBay or Amazon, or allow sales to be put through manually via an admin panel. Tick the Download check box to enable sales to be imported from a specified market. Sales Sources can be added or deleted using the File Import - Add Sales Source and Delete Sales Source options in the Actions menu.
Order Processing
Place All Downloaded Orders On Hold automatically changes the status of every imported order to On Hold. This means that the order cannot be marked as dispatched or posted to an accounts package until its status has been changed manually in the Order Module.
Create Tradebox Product Records instructs Tradebox to create new products in the Product Module where a SKU in a downloaded order doesn't already exist. The product record created will only contain the minimum information required, such as SKU and description, and will not contain information such as price, location, dimensions etc. This is not applicable if you're using Accounts Software or None as your stock control method.
Don't Update Tradebox Stock Levels is an option only applicable if you have Tradebox set as your stock control method. If ticked, Tradebox will not amend stock levels in its own database based on orders received through this channel.
Ignore Orders Dated Prior To allows the user to establish a watershed date in the channel where the software will ignore any orders with an order date prior to the date entered.
Ignore Orders Dated After: Allows the user to download orders up to a certain date and prevent any orders downloading after that date. This would usually be used where certain settings would apply up to a specific date, and different settings after that date, for example, the date you become VAT registered.
Invoice Date allows the user to choose the date to use on the invoice produced by Tradebox. The options are:
- Order Date - The date the order was placed
- Payment Date - The date the order was paid for
- Despatched Date - The date the order was despatched
By default, this option is set to Order Date. Payment Date and Despatched Date can only be used if they appear in the CSV file and are mapped to the relevant Tradebox fields in the Import Mapping Tab.
Discount Type allows the user to configure the type of discounts applied on downloaded orders which inform how the order is calculated in Tradebox. The user can choose:
- None - No discounts to be applied
- Order Discount - This applies a discount to the entire order
- Item Line - This applies a discount to the item, rather than the order. If chosen, Tradebox needs to know whether to apply the discount to the total number of units on the line, or, whether to apply the discount of each unit.
- Line = discount the line price after the unit price has been multiplied by the quantity
- Unit = discount the unit price before the unit price has been multiplied by the quantity
Uploads
- Don't Upload Zero Quantities: Tradebox will not include any products with a stock level of zero in the stock upload file.
- Upload Negative Quantities as Zero: If a stock level is negative, Tradebox will convert the stock level to zero instead.
- Upload Quantities for Bundles: Bundle products in Tradebox are by default excluded from uploads. Ticking this box will include them.
- For Sage BOM use Quantity to Make Up: If you're using Sage stock control and have BOM (bill of materials) products, Tradebox can calculate the number of BOM end products that can be made up from the component products, and include that in the stock upload file.
Please see our Uploading Stock Levels guide for more information.
VAT
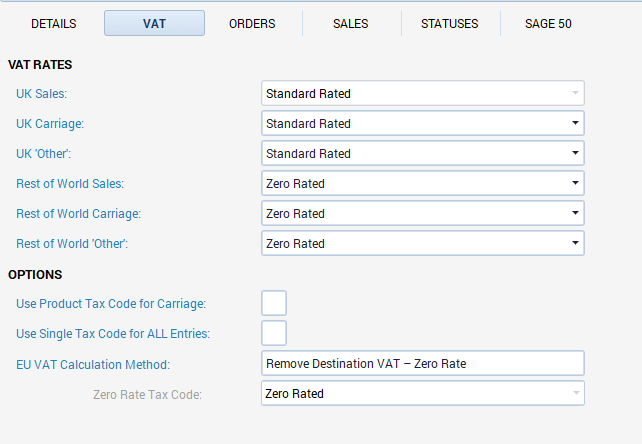
The VAT section of the channel details shows a set of default tax codes for UK and Rest of World. The illustration above shows the default codes for a business on the standard VAT scheme. The UK Sales dropdown only applies to users who are running without any stock control; if you are using stock control in either Tradebox or an accounts package, Tradebox will automatically use the tax code on the product record and the UK sales options will be greyed out.
Use Product Tax for Carriage: If you are selling goods with a mixture of tax codes, you may wish to select this option. With this setting turned on, if all of the products on an order are non-vatable, then no VAT will be applied to the carriage. If any product on the order is standard rated then the carriage will also be standard rated, even if the majority of the products are non-vatable.
Use Single Tax Code for ALL Entries: If ticked, all sales and carriage through the channel will use the code you choose from the dropdown that appears. This takes precedence over all other VAT settings except the per-customer tax code within the Contacts screen.
EU VAT Calculation Method
For EU sales, there are four options you can choose from.
1. Remove Destination VAT - Zero Rate: When this option is selected, Tradebox will take the gross total from your file and strip out the VAT amount at the rate applicable in the destination country, or the product tax rate for that specific country, so only the net amount will be posted to your accounts.
2. Calculate Destination VAT on orders less than €150: To be used where you are liable for VAT on EU orders up to a value of €150. This will instruct Tradebox to check the tax rates you have applied against each EU country in Configuration > Countries within Tradebox. The tax rate will be determined based on the standard rate of the country the order is being shipped to, or the product tax for that country.
3. Calculate Destination VAT on All Orders: This is used if you are liable for VAT on all EU orders, regardless of their value. The tax rate will be determined based on the standard rate of the country the order is being shipped to, or the product tax for that country.
4. Zero Rate Gross Value: With this option, Tradebox simply takes the total value from the website and applies a zero rate tax code to it. When this option is selected, a secondary option becomes available which allows you to choose which of your zero rated tax codes you want to use for these sales.
For more details on how Tradebox deals with VAT, see our article here.
Orders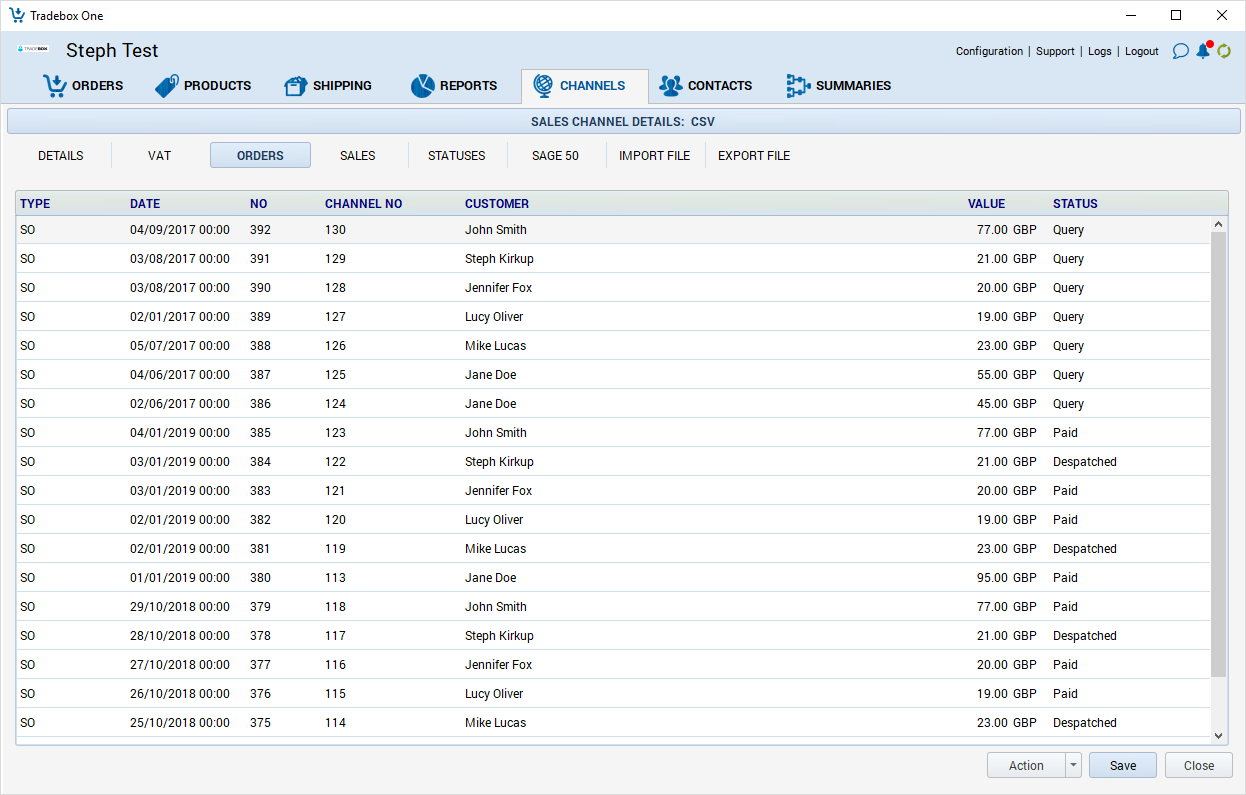
The orders section of the channel will display all orders that have been downloaded for that particular channel. It displays the following information:
Type: Displays either SO (Sales Order) or SC (Sales Credit Note).
Date:The order date. By default, this is the date the order was placed.
No. The Tradebox order number, which is automatically assigned on download.
Channel No.The order number from the channel, in this case, the Amazon order number.
Customer: The customer's name.
Value: The total value of the order.
Status: The order status within Tradebox.
Double clicking on any order in the grid opens the order in full. The grid can be sorted by any column and is sorted by order date by default.
Sales

The Sales page of the channel details shows a breakdown of the sales value for this channel by month over the past three years, with the option to view as a bar graph or line chart.
Statuses
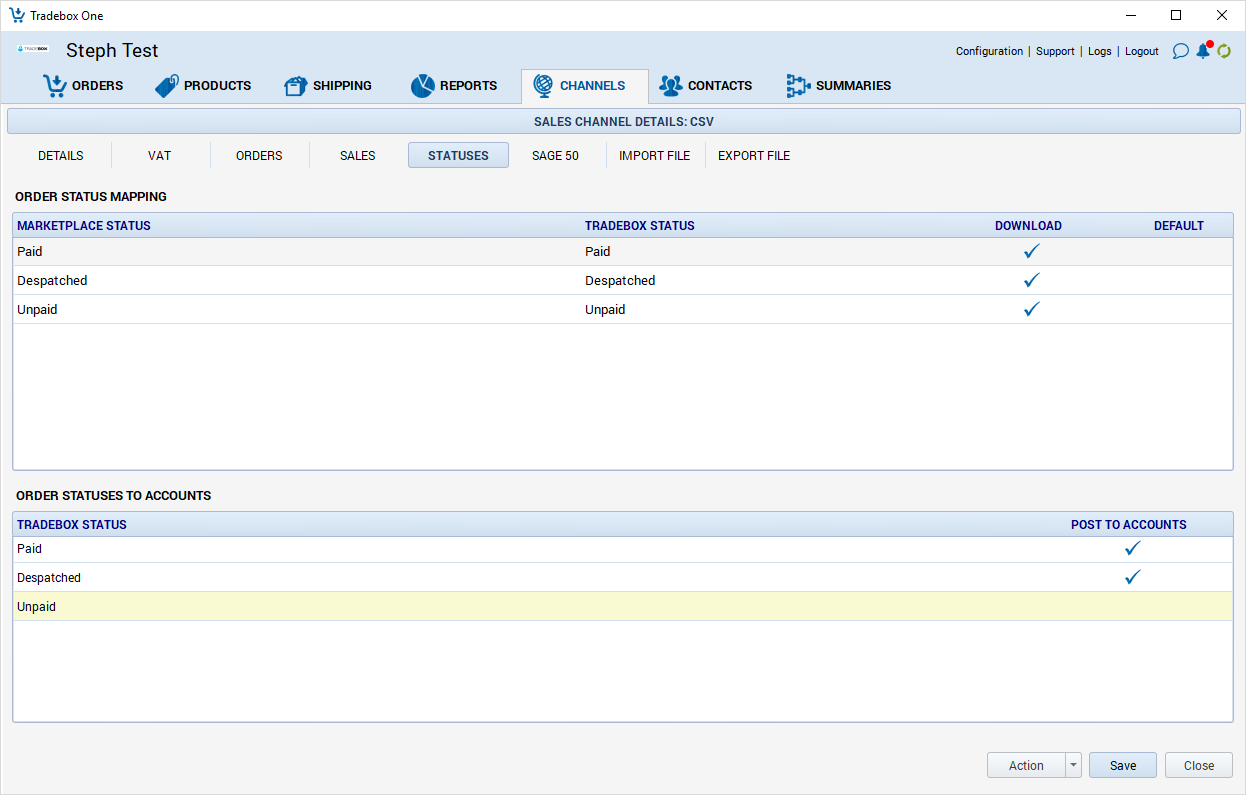
The top section of the Statuses tab displays a list of marketplace order statuses and the corresponding Tradebox order statuses they are mapped to. This controls at which status your orders will download to Tradebox. The bottom section of the grid controls which statuses are set to post to your accounts package (if integrated). To edit a marketplace status, select edit or double click on it and a pop up box will appear that allows you to choose what Tradebox status to map it to, and whether you want that status to download. To edit a Tradebox status, select edit or double click on it and a pop up box will appear that will allow you to choose whether or not you want orders with that status to post to your accounts. You can add or delete marketplace statuses using the 'Statuses - Add New' and 'Delete' functions in the Action menu in the bottom right.
You can find more detailed information about this here.
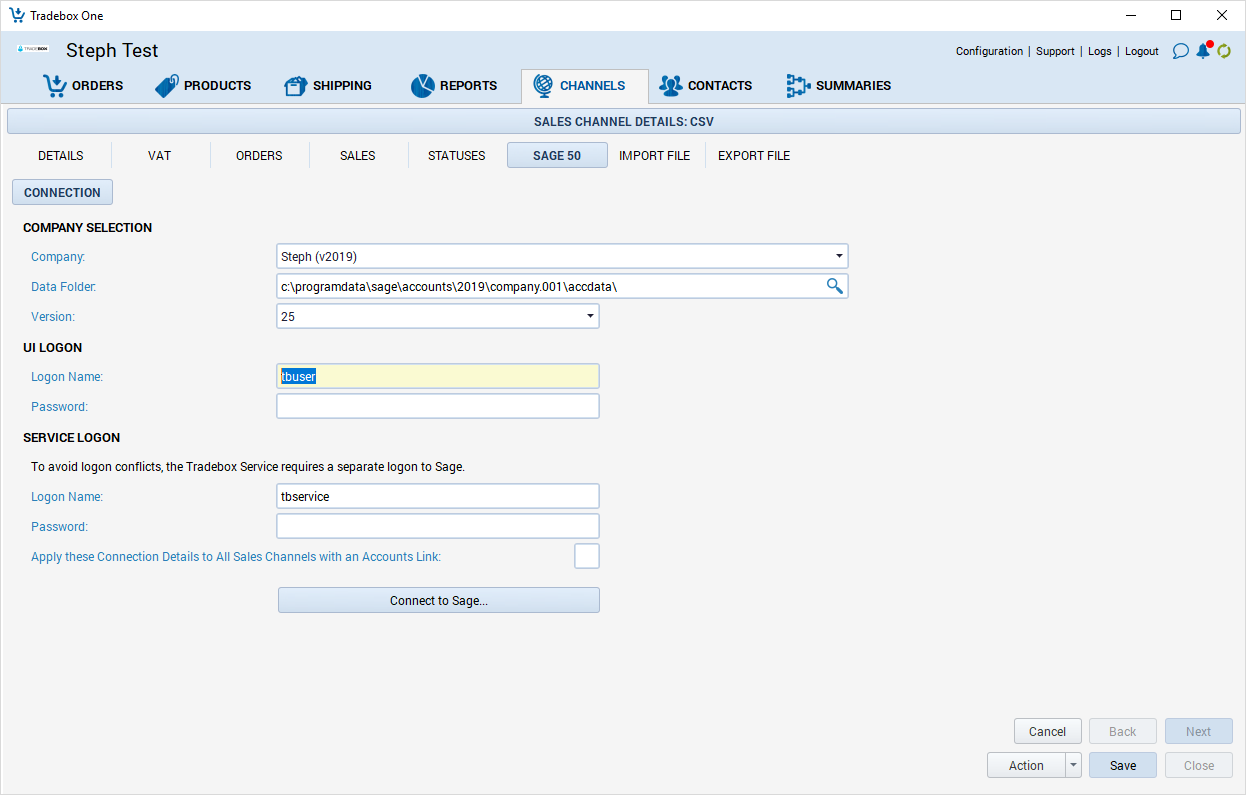
Sage 50/Xero
If you have opted to link Tradebox to an accounts package, you will see either Sage 50 or Xero displayed as an additional tab within the channel. This holds the connection details for your accounts package, and, once connected a new range of tabs will open up. The Sage 50 connection page is shown below:
For full instructions on setting up the accounts link, please see our guides for either:
or
Import File
The Import File tab of the channel is split into two further sections: Import File Details and Field Mapping.
Import File Details
Import File Details
Column Delimiter: The character used to delimit fields in your file. Tradebox can accept comma, tab or semi-colon delimited files.
Date Format: The format in which the date appears in your file.
Total Shipping Cost: how the shipping cost is displayed against each item in the file. The options are; 'Duplicated Cost Across Lines', or, 'Individual Cost Per Line'. This choice dictates how Tradebox calculates the carriage in the file. See how is shipping cost calculated? for more details.
Price Is: This option decides whether Tradebox multiplies the Unit Price by the quantity to get the line total, or, divide the Line Price by quantity to get the price of one unit.
'Other' Amount: This choice dictates how Tradebox calculates the Other Amount in the file, usually an additional service that is charged for, like gift wrapping or insurance. The options are; 'Duplicated Cost Across Lines', or, 'Individual Cost Per Line'. This choice dictates how Tradebox calculates the Other Amount in the file.
Import File Has Column Headers: Whether or not the import file has a header row. If the first row in your file is the order information, untick this box.
Truncate Messages to 255 Characters: The maximum amount of characters Tradebox can handle in a customer message is 255. The default behaviour is that if a message exceeds this limit, Tradebox will ignore the order file to draw your attention to the problem so you don't miss instructions from the buyer. If this box is ticked, Tradebox will automatically crop the message at 255 characters. Orders with messages longer than this will be imported, but you may miss some information.
FTP Download Details
If the CSV file is being populated to an FTP then Tradebox can be configured to collect the file:
Server is the FTP address. This should always be populated with FTP:// followed by the domain address or IP address, including any subdirectories, e.g. FTP://www.tradebox.co.uk/CSV orFTP://123.456.789/CSV.
User Name is the FTP login name that Tradebox requires to log onto the FTP.
Password is the password required for Tradebox One to log onto the FTP.
A File Name can be supplied to identify the file if the CSV file always has the same name, for example, orders.csv. If used Tradebox will only download files with this specific name. If the CSV file name is always different then this field should be left blank.
Port: By default this will show as 0, meaning Tradebox will attempt to use the default port per connection type (FTP: 21, SFTP: 22, FTPS: 990, FTPS over TLS: 21). If your connection requires a different port, enter it here.
Enable SSL: This option should only be ticked if your FTP requires SSL. Check with your FTP provider if you are unsure.
FTP Uses Active Mode: this setting is unticked by default and should only be ticked if you require an Active FTP connection (most do not). If you are unsure whether your FTP requires an Active or Passive connection, check with your FTP provider.
Delete File From Server After Download: If ticked, this will delete order files from your FTP location once Tradebox has processed the file. If you have multiple channels reading the same file from the same FTP, this should be left unticked so all channels can access the file. Deleting files from the FTP after they've been read isn't necessary for Tradebox; each sales channel will check each order to see if it has already been presented on an earlier download, so there's no risk in having the same file downloaded and processed multiple times.
Disable Downloads from FTP Server: Ticking this box effectively switches off the FTP download and stops Tradebox from interrogating the FTP for any new files. The channel can still download orders, but the file would need to be manually placed into the input folder.
Field Mapping
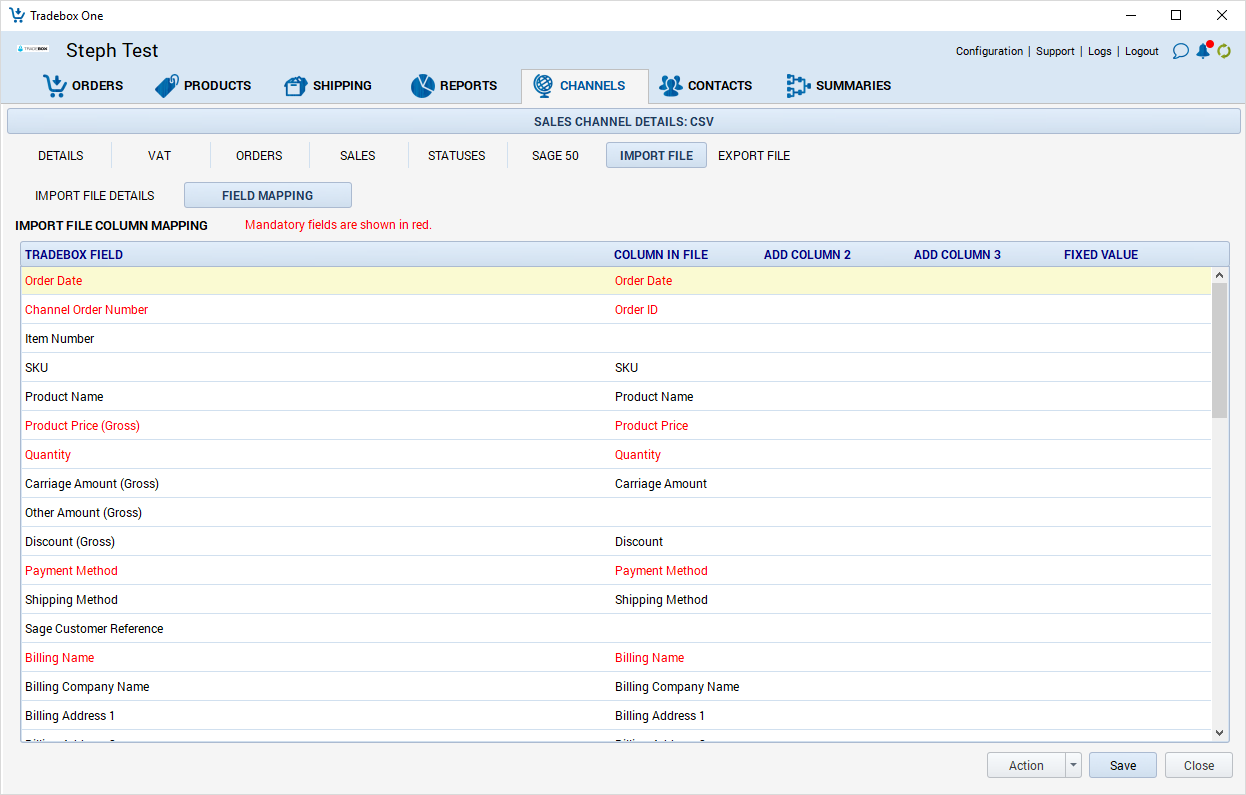
This grid displays the available Tradebox fields and which fields in the CSV file they are mapped to. The first column contains the Tradebox Fields which are displayed in red if they are mandatory. If a mandatory field (with the exception of Channel Order Number and Order Date) is not provided in your file, you can type a fixed value into the Fixed Value column which will then be used for all orders. When you click into a field in the grid, an explanation of the field will be provided in the Field Description at the bottom of the screen.
Sometimes you may need to add fields together in the file. For example, if your file only carried the buyer's first name (John) and last name (Smith) was in a separate column, you may wish this to appear in the Tradebox Billing Name field as John Smith. To enable this there are 2 additional columns; Add Column 2 and Add Column 3. To enable John Smith to be entered as the Billing Name in Tradebox you would enter the First Name and Last Name as follows:
| Tradebox Field | Column in File | Add Column 2 |
| Billing Name | First Name | Last Name |
This functionality is also useful to calculate gross prices, which are a prerequisite of the software. If the CSV file contains the Item price (exclusive of VAT) and the Item VAT price this feature can be used to combine the 2 prices to calculate the gross price.
| Tradebox Field | Column in File | Add Column 2 |
| Product Price (Gross) | Item_Total | Item_Total_Tax |
Mapping allows the user to export and save a mapping template file based upon the mappings and settings in the Import File Tab. This is saved in the Tradebox data directory and is named after the channel with the extension 'iff', so if the channel was called 'websales' the exported mapping template file would be called 'websales.iff'. This is useful if you were setting up multiple channels for identical files.
Import Mapping allows the user to import an IFF Mapping file. Choosing this option automatically imports all of the configuration and mapping settings contained in the IFF file.
Export File
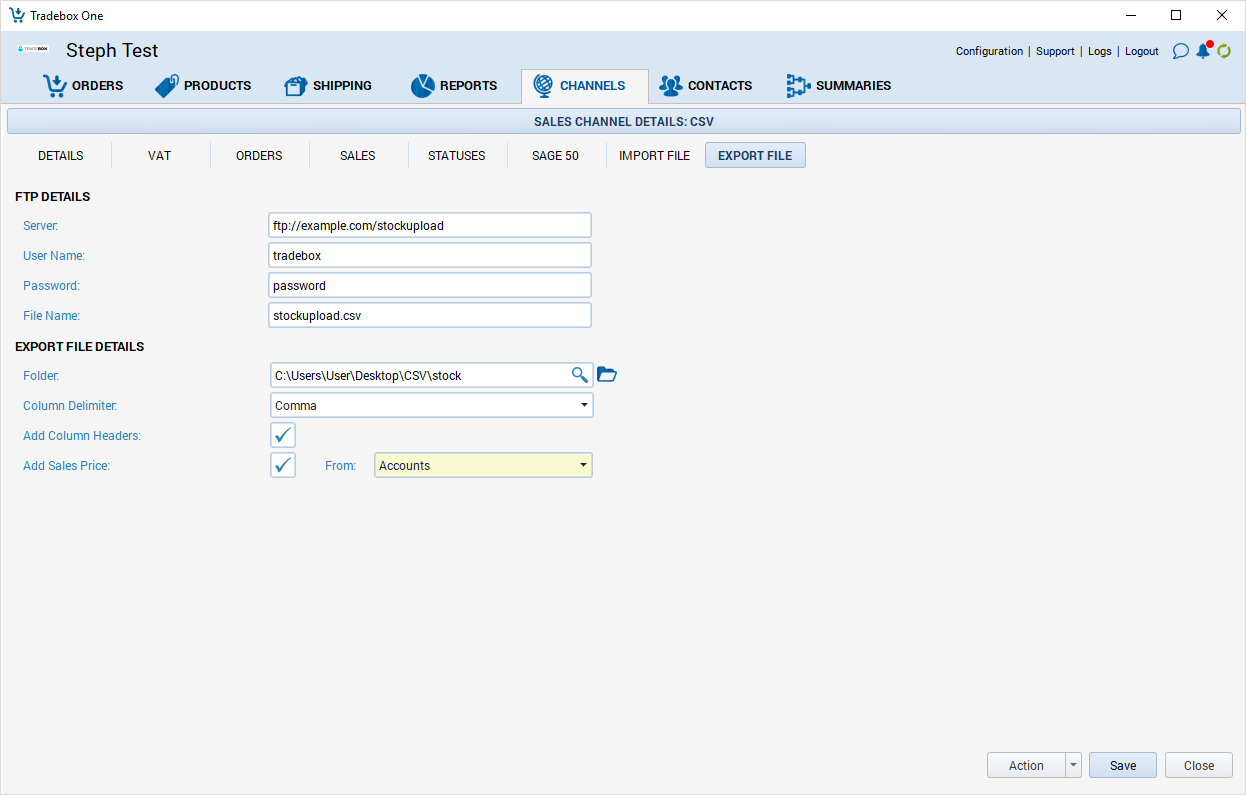
For CSV channels, Tradebox cannot upload stock levels directly back to the site, however it can be configured to export a CSV of stock levels from either your accounts package or Tradebox, depending on which stock control method you've chosen. This can be exported to a local folder on your PC which you can specify and also, if required, uploaded to an FTP location.
As well as the stock level, if you select the option to Add Sales Price, Tradebox can also include the price from the product record in Tradebox or your accounts package to upload to your site.
If your uploads are set to automatic, the file will be created every time Tradebox gets to the upload stage of its cycle. If the stock uploads are being done manually, the file will only be created when you click the Upload Stock Levels button in the Products screen.
As the files only contain changes in your stock levels, they are not overwritten but instead are dated and time-stamped so that no stock level changes are missed if you're uploading them to your site manually.
Comments
0 comments
Article is closed for comments.