
A common request from users is for Tradebox One to export data that it has retrieved from the marketplaces; either for analysis or for import into another system such as couriers or accounts packages we don't have a full integration with. While Tradebox One doesn’t offer an API, it does offer a few methods of data export for manipulation outside the program.
Sending the Orders List to Excel
To create a spreadsheet of the details visible from the orders list itself, go into the Actions menu across the top of the list, and then choose Export List Contents to Excel.
This is as the same top-level view as the orders list shows; one line per order with total but no breakdown of the items, carriage, addresses etc.
Any additional columns, sorting or filtering applied to the list are retained; the spreadsheet will appear exactly as the grid does in Tradebox One.
Exporting Detailed Order Data as CSV or TXT
To export more detailed data, within the orders list click the Actions menu, and then choose Export Orders to File. This process uses its own criteria to filter orders, so it will not take into account any filters you currently have applied to the orders list.
On the Export Orders to File box that appears, you can start defining your file.
First, choose your file format; comma-delimited CSV or tab-delimited TXT.
Next, choose your layout file. Tradebox comes with an All Fields layout file as standard; if you wish to alter the layout see the section below on creating an Export Layout File. Once you have multiple layouts, you can use the  icon to navigate between them.
Next choose a filename and a location for the Output File. If you use an existing filename the old file will be overwritten.
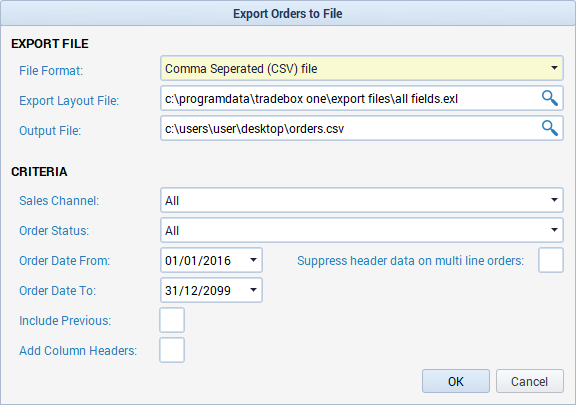
Criteria
Sales Channel: Choose which sales channel you wish to export orders from, or choose all.
Order Status: Choose which Tradebox Order Status you wish to be included in the export file, or choose all.
Order Date From/To: Will filter by order date, inclusive.
Include Previous: By default, each order will only ever be exported once – a flag against each order is set once it has been included in an order export (regardless of layout used). If you need to include orders that have been previously exported, tick this box.
Add Column Headers: If ticked, row 1 of the file will be the column headers and the first order line will appear on row 2.
Suppress Header Data on Multi Line Orders: For orders with multiple distinct items, Tradebox reads and stores the Header which contains information like the buyer's name, addresses and order total, and the Item Lines which contain the individual per-product information. By default, Tradebox will repeat the header information on each line of a multi-line order. To instead only show the header information on the first line of each order, tick this box.
Line-by-Line or One-Line-per-Order?
Tradebox always stores information at the item line level; it's the only way to handle certain information such as a mix of VAT and non-VAT goods. This may be too much detail for your export, or may cause duplication if you're feeding into a system that expects one line per order. So, if your Export Layout File contains any fields that are item-line specific (such as the SKU, product description or unit price), the file will be exported on a line-by-line basis. The default All Fields layout works line-by-line. The aforementioned Suppress Header Data on Multi Line Orders option will determine whether each line is always fully populated or not.
If on the other hand, you've set up an Export Layout File which only contains Header information, Tradebox will automatically create the file as one line per order.
Creating an Export Layout File
To customise which fields are including in the export file and in which order, go to Configuration > Export File Formats.
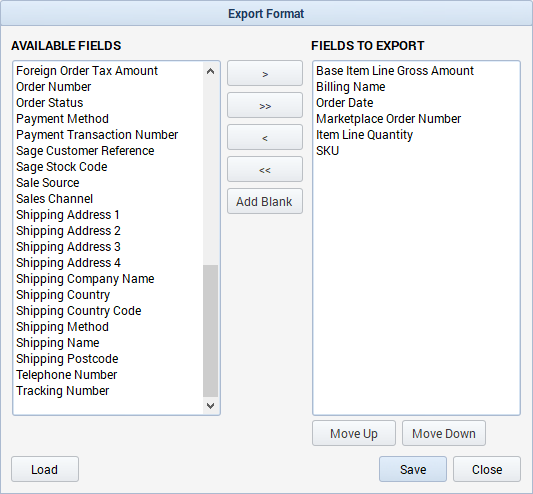
In the Export Format screen, you have a list of available fields on the left. You can choose which fields you want to export by moving them from the left hand column into the right hand column, and adjust the order of the fields by using the Move Up/Down buttons. Add Blank adds a blank column which can be moved up and down like any other field.
Once you're done, click Save. Give your Export Layout File a name and save it to the default directory. To make changes to an existing layout, open the Export Format screen and use the Load button.
Comments
0 comments
Article is closed for comments.